EverWorker Claude Code Plugin (AI Builder)
The EverWorker Claude Code Plugin - also called the AI Builder plugin - connects Claude Code directly to your EverWorker instance. Once connected, you can build, edit, test, and run your AI Workers and AI Workflows just by describing what you want in plain language. Claude Code does the work; you direct it.
Think of it as a second doorway into the same EverWorker platform you already use in the browser - except instead of clicking through screens, you have a conversation.
Note: The plugin enforces the exact same permissions as the EverWorker web interface. The token you connect with reflects your role, so anything your role can't do in EverWorker will also be blocked here - with a clear error.
Why we built it
Building in EverWorker is powerful, but it asks you to know where everything lives - which screen, which tab, which node. The AI Builder plugin removes that friction. You say the outcome in business language, and the plugin plans it, builds it, tests it, and connects it for you, end to end.
It matters for three reasons:
- Speed - go from an idea to a working, tested AI Worker in a single conversation, instead of assembling it screen by screen.
- Lower barrier - you don't need to remember the platform's mechanics. You describe the intent; the plugin handles the how.
- One assistant, all the parts - Workers, Workflows, Knowledge, Connectors, schedules, and triggers are all reachable from the same conversation.
What it can do
The plugin is not a blank-slate code generator. It is connected live to your EverWorker instance, which makes it far more capable than a generic AI assistant:
- It sees what you already have. It is aware of your existing AI Workers, AI Workflows, Connectors (providers/connectors/apps), Knowledge sources, and Code Nodes. It can list them, read them, and build on top of them.
- It can create from scratch. Describe an outcome and it designs and assembles the whole thing for you.
- It can edit what exists. Point it at a Worker or Workflow you already have and ask for changes - it modifies the real thing, in place.
- It can run and debug. It executes Workers and Workflows, watches the results, and fixes failures step by step.
Here is the full surface it covers:
- AI Workflows - plan, build, edit, and test step-by-step automations (the Canvas pipelines).
- AI Workers - build and edit conversational AI Workers: chat assistants, Slack-style personas, reasoning agents with a tool belt.
- Code Nodes - create, edit, and test reusable custom logic blocks used inside Workflows.
- Knowledge (Memories & Collections) - set up the data layer: upload documents, URLs, or files and turn them into searchable Knowledge (RAG), or build structured data tables.
- Connectors / Apps - see which Connectors are available and wire them into what it builds; it's aware of every provider already configured on your instance.
- Schedules - make an existing Worker or Workflow run automatically on a timetable (e.g. every morning, hourly).
- Webhooks - set up an inbound trigger so an outside system (Slack, a form, another app) can kick off a Workflow.
The short version: it turns "building in EverWorker" into a conversation. You say what you need, and it plans, builds, edits, tests, schedules, and connects your AI Workers and Workflows - aware of everything that already exists on your instance.
Coming soon: autonomous Provider & Connector setup
Coming soon. This feature is on its way to the plugin.
A new capability is being added: autonomously configuring Providers and Connectors.
If your solution is missing a Provider or Connector, Claude Code can set it up for you - and even test it on its own. All you have to do is enter your key by opening the link it gives you.
No more provider hassle.
How it works (the safe-by-design parts worth knowing)
You don't need to be technical to use the plugin, but a few design choices are worth understanding because they keep your instance safe:
- It follows a Plan → Build → Test discipline. For anything substantial, it first plans - restating the goal in one sentence and mapping it to the simplest combination of features - and shows you the shape before building anything.
- Nothing destructive happens silently. It keeps a local copy of everything it builds, and always asks for confirmation before deleting or overwriting something it didn't create in the current session.
- It respects your role. The connection token mirrors your EverWorker permissions exactly. A regular user can't create webhooks; only Admins can - same rules as the web app, enforced on the server.
- Your credentials stay protected. The connection uses a personal API token stored securely in your operating system's keychain. It is shown to you only once, at creation time.
Tip: Because it's aware of your whole instance, a good first request is simply "What AI Workers and Workflows can you see?" - it will list them, and you can take it from there.
How to install it
Installation is a one-time setup in your terminal. After that, the plugin works in other environments also Claude such as Visual Studio Code extension, and so on.
Why the terminal first? Due to a current Anthropic limitation around third-party marketplace plugins, the initial install must be done from the terminal. Once installed, terminal is not required to use it - it's available in other IDEs. The only current exception (due to the same Anthropic limitation) is Claude Code Desktop.
Prerequisites
- Claude Code installed on your machine.
- Access to the EverWorker instance where you want the changes to take effect. (The plugin acts on whichever instance you connect it to, so make sure it's the right one.)
Step 1 - Open the Connect Claude Code panel in EverWorker
- Log in to the EverWorker instance you want to work with.
- Go to your Profile → click on your name → API tokens.
- Click Connect Claude Code.
- Follow the instructions shown in the panel - the steps below mirror them.
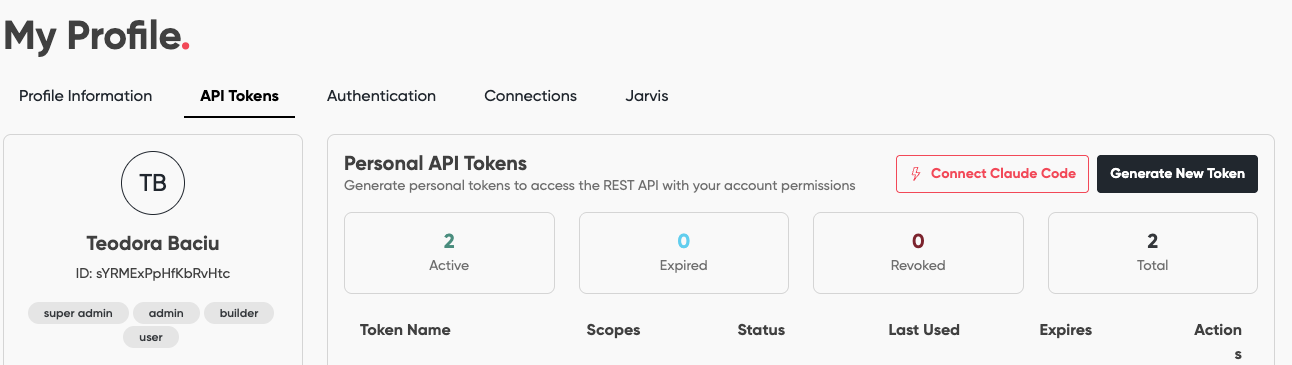
The panel gives you everything you need: the install commands, your EverWorker URL, and a one-time API token.
Important: The API token is shown only once. Copy it immediately. If you lose it, just click Connect Claude Code again to generate a new one.
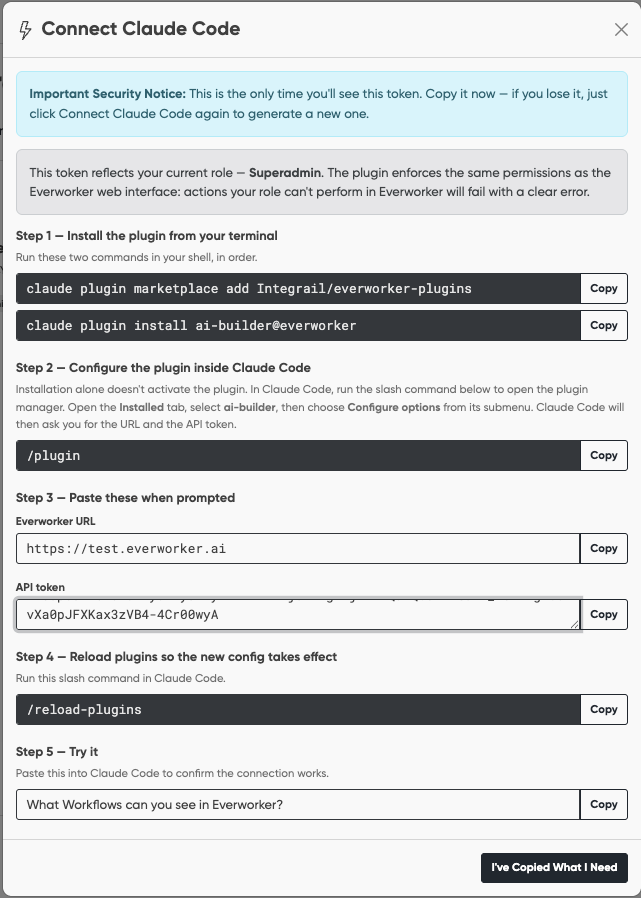
Step 2 - Install the plugin from your terminal
Run these two commands in your shell, in order:
claude plugin marketplace add Integrail/everworker-pluginsclaude plugin install ai-builder@everworkerStep 3 - Configure the plugin inside Claude Code
Installing alone doesn't activate the plugin - you need to give it your URL and token.
-
In Claude Code, run the slash command:
/plugin -
Open the Installed tab, select ai-builder, then choose Configure options from its submenu.
-
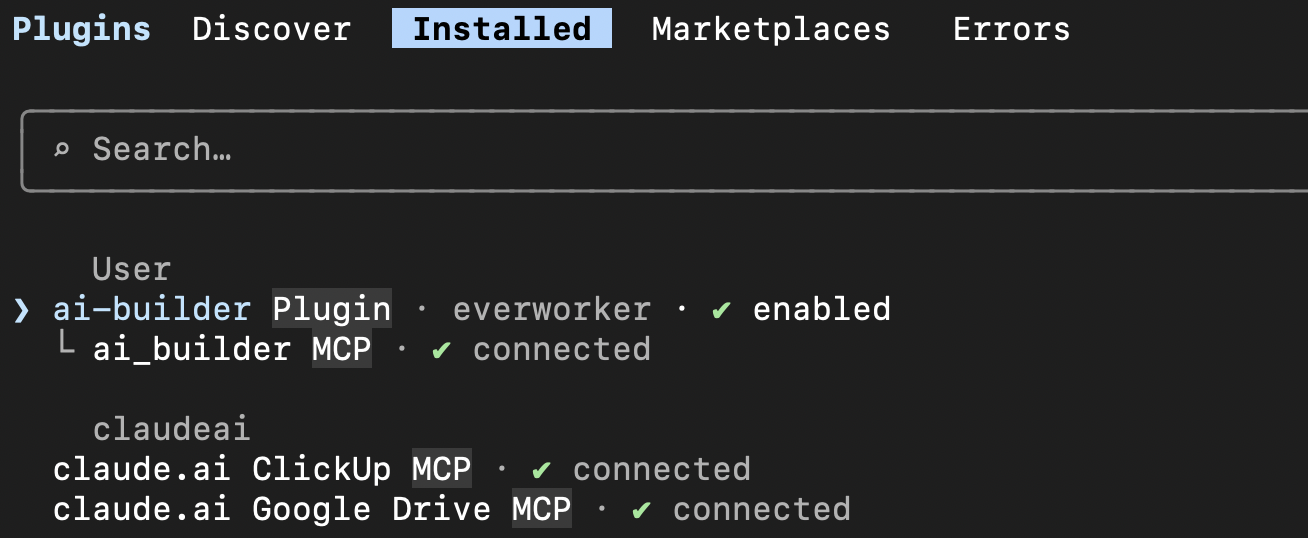
Claude Code will ask you for the EverWorker URL and the API token.
Step 4 - Paste your URL and token when prompted
Copy these from the Connect Claude Code panel in EverWorker (Step 1):
| Field | Where it comes from |
|---|---|
| EverWorker URL | The URL shown in the panel (e.g. https://your-instance.everworker.ai). |
| API token | The one-time token shown in the panel. |
Step 5 - Reload plugins so the new config takes effect
In Claude Code, run:
/reload-pluginsStep 6 - Try it
Paste this into Claude Code to confirm the connection works:
What Workflows can you see in Everworker?If it lists your Workflows, you're connected. From here you can ask it to build, edit, test, or run anything your role allows.
Troubleshooting
| Issue | Solution |
|---|---|
| The plugin doesn't appear after installing | Make sure you ran both install commands in Step 2, then run /reload-plugins. |
| Connection fails / can't see anything | Re-check the EverWorker URL and API token in Step 4. The token is one-time - if in doubt, generate a fresh one via Connect Claude Code. |
| An action fails with a permissions error | The token mirrors your EverWorker role. If your role can't perform that action in the web app, it's blocked here too - ask an Admin if you need broader access. |
| You connected to the wrong instance | The plugin acts on whichever URL you configured. Re-run /plugin → Configure options and point it at the correct instance. |
Updated about 2 months ago