API Reference
Terminology
API request - a web request executed via application capable of sending such requests. Example include but are not limited to browsers, POSTMAN, custom programs written in any language capable of executing https-based requests. Typical request types used with EverWorker platform are POST and GET type requests. API requests consist of headers and a body in JSON format (for POST requests). Authentication is done via using tokens in one of headers.
Token (JWT token) - authentication secret used to impersonate a certain user in order to access the platform. Each user can create their own tokens, and administrators can see each token (but not its value) and its expiration date in Settings.
Agent - an AI Worker or AI Workflow designed in the platform. Agents are executable using API via their agentID that can be found in the URL of any agent configuration. AgentID is a unique identifier for each worker.
Execution - A single run of an agent. Execution and its ID is important to query status and results for a certain run that was called using API. Executions are referenced using ExecutionID that is visible in a result response to an API call to execute an agent.
Session - A single chat/execution context that can be followed up with further queries. You can pass SessionID (see examples below) to continue previous conversations with workers instead of starting new ones.
Authentication and token creation
In order to be able to execute API requests towards the platform, a user must access their profile (top right corner button with a dropdown), switch to "API Tokens" tab and generate a new token with a custom name and expiration date.
Tokens can be revoked from the same interface where they are created
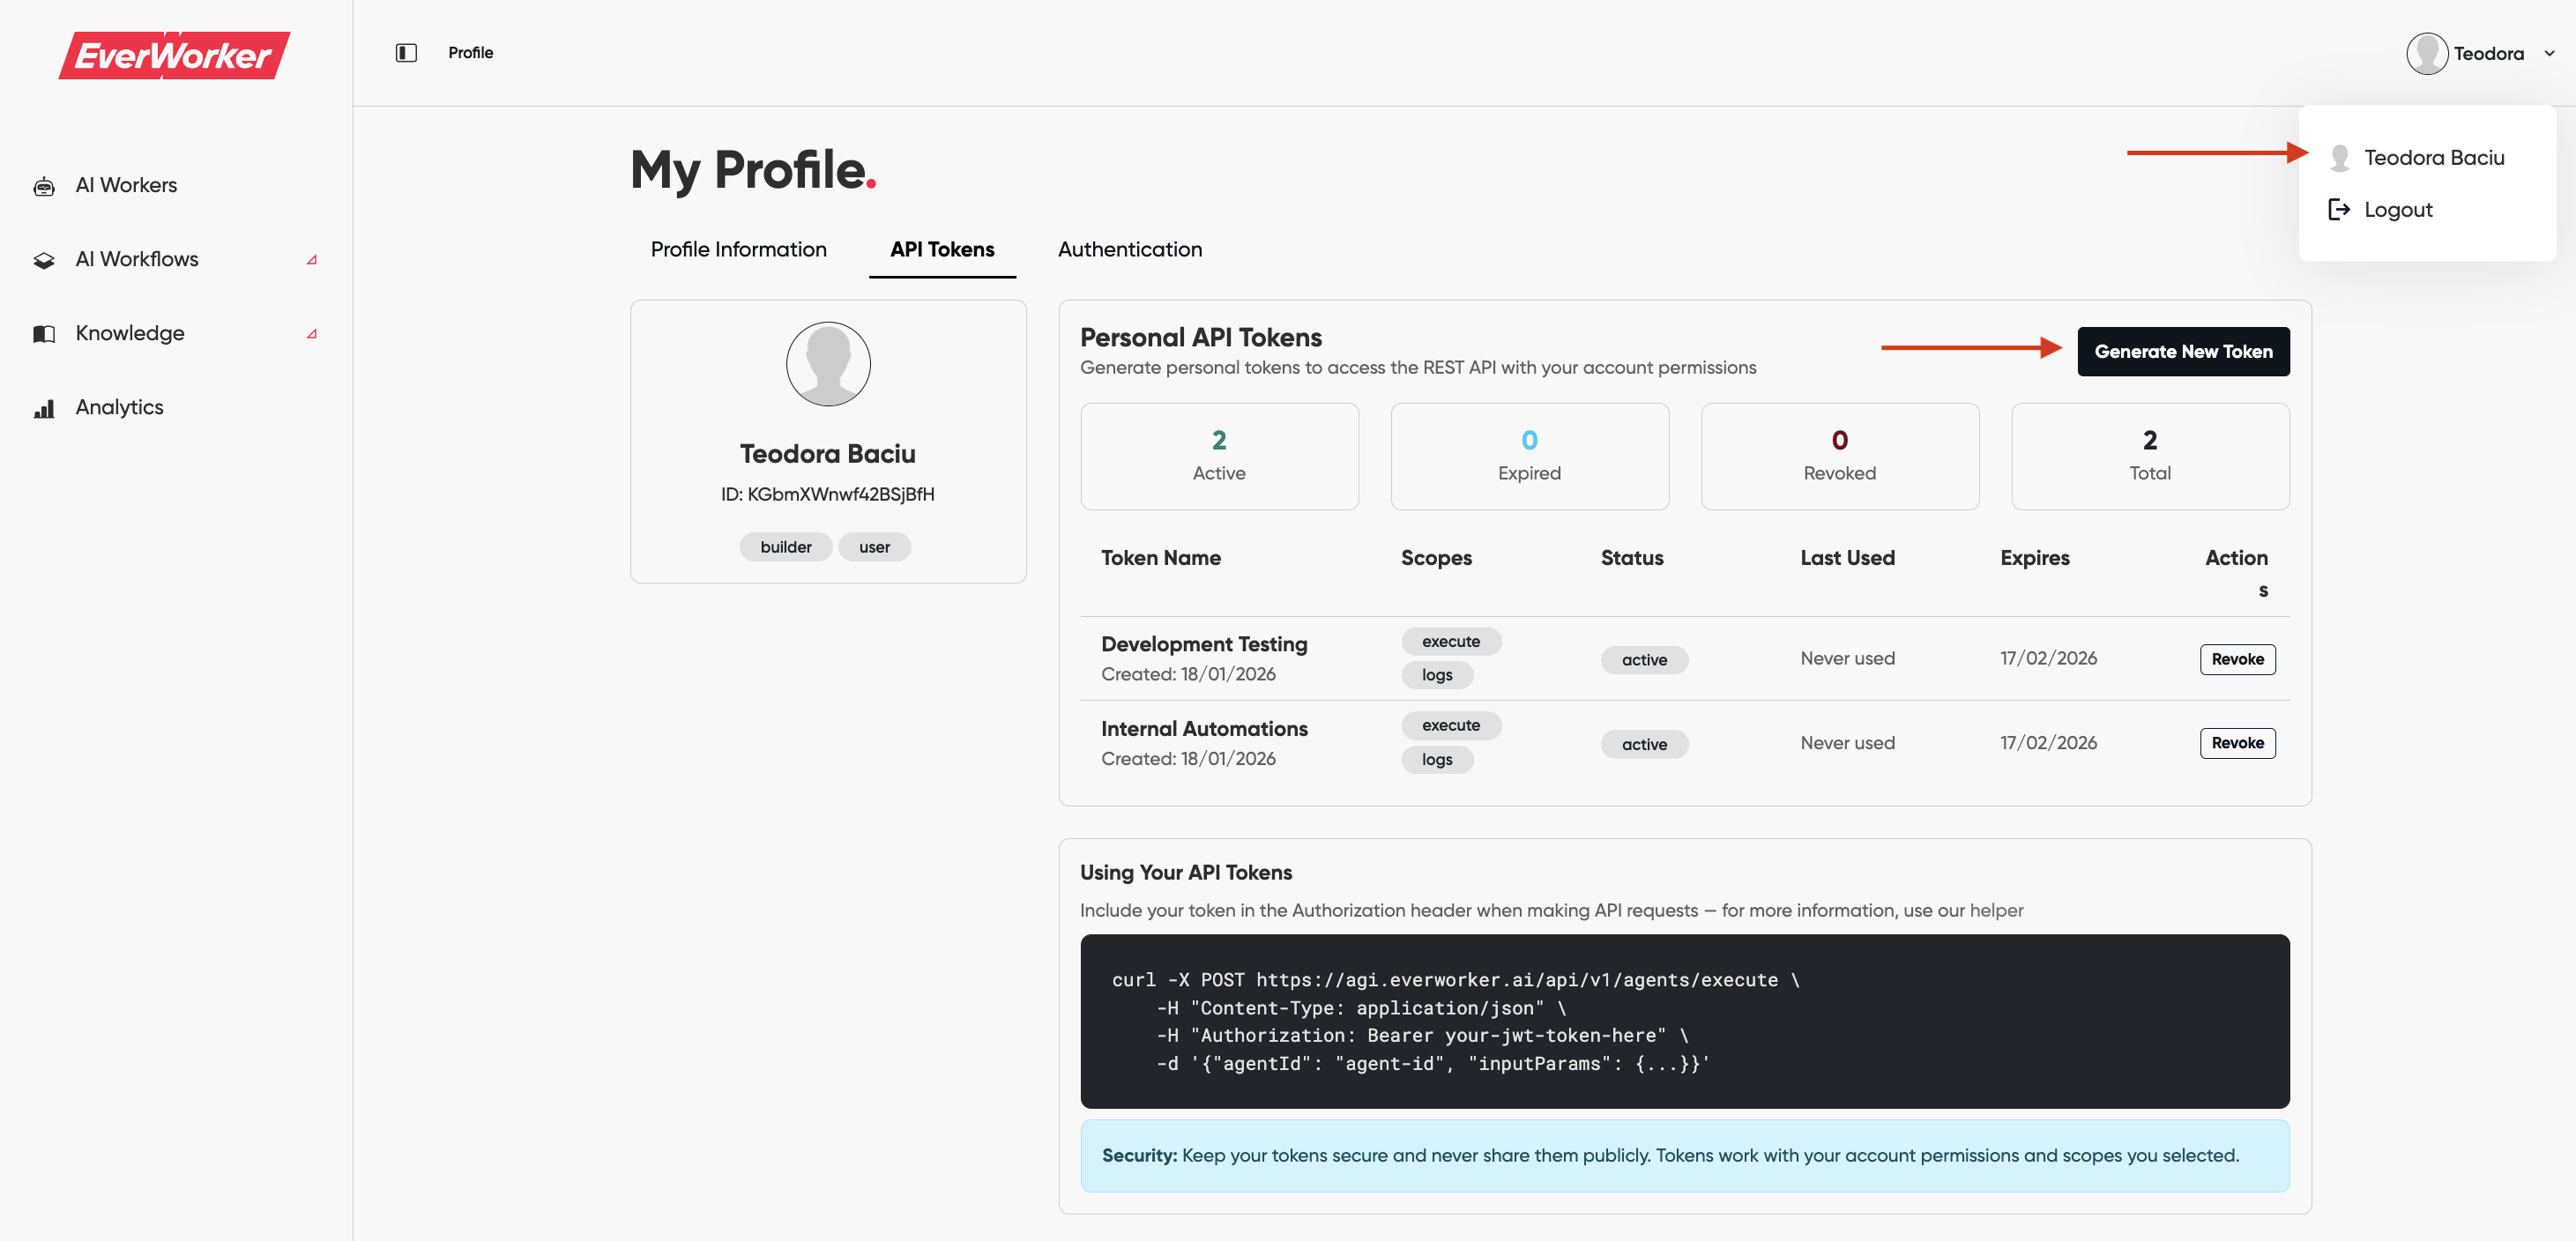
During the token creation, you have 5 different permission types you can assign to the token:
agents:execute- allows executing agents (AI Workers and AI Workflows) via REST APIagents:logs- allows accessing execution logs via REST APIagents:health- allows accessing health check endpointsobservatory:write- allows superadmin operations (not covered by this guide)admin:all- full administrative access (admin only)
Make sure to copy the token value to a secure vault/password manager/write it down, because you cannot access its value in web UI after it's created for security considerations.
In all future requests, this token will be used in headers of HTTP requests. Header name "Auhorization", header value "bearer <token>".
Finding AgentID
AgentID can be found in URL of a worker.
- When you chat with an AI Worker, its URL will look like https://agi.everworker.ai/universal/chat/FbAfoT2ecyPnFZC4K. Here
FbAfoT2ecyPnFZC4Kis AgentID. - When you edit an AI Workflow in Canvas, its URL will look like https://agi.everworker.ai/specialized/canvas/ofim7r2az6dxgSDte. Here
ofim7r2az6dxgSDteis AgentID.
Finding SessionID
SessionID allows to continue previous conversation with an AI Worker. You can only obtain it after executing an agent at least once. The execution result will contain the sessionID. You can also set the history limit in each request to control the amount of chat history used for further executions.
For an example, check the "Execute Agent" -> "Example execution result" below.
Base URL
HTTPS executions are called against Base URL for your organization, that looks like account_name.everworker.ai. So if your account name is "test", then a target URL for a call with the URL path "api/v1/agents/health" would be https://test.everworker.ai/api/v1/agents/health.
API call types
Health Check
- URL path:
api/v1/agents/health - Method:
GET - Headers:
Authorization: bearer <token>
Typical response:
{
    "success": true,
    "data": {
        "service": "agents-api",
        "status": "healthy",
        "timestamp": "2025-09-01T01:42:33.786Z",
        "orchestrator": {
            "available": true,
            "activeExecutions": {},
            "maxConcurrentExecutions": 0
        }
    }
}
Execute Agent
- URL path:
api/v1/agents/execute - Method:
POST - Header:
Authorization: bearer <token> - Header:
Content-Type: application/json - Body:
Body in JSON format with agentID, sessionID and input parameters in JSON format
Input parameters depend on what input parameters were configured in the actual worker.
- For AI Worker, it is typically "userMessage" that consists of "role" (user) and "content".
- For AI Workflow, it will be a list of input parameters used in Input node, with the names given to them in Canvas.
Request body parameters
| Parameter | Type | Required | Description |
|---|---|---|---|
agentId | string | Yes | The unique identifier of the AI Worker or AI Workflow |
sessionId | string | No | Session ID to continue a conversation. Use "new_session" to start fresh |
inputParams | object | No | Input parameters for the agent (varies by agent type) |
bypassCache | boolean | No | Force fresh execution, skipping cached results (default: false) |
parentExecutionId | string | No | Link this execution to a parent execution for tracking |
debugLogging | boolean | No | Enable detailed debug logging for this execution |
Example body usage when executing AI Worker
{
	"agentId": "{{agentId}}",
	"sessionId": "new_session",
		"inputParams":
    {
      "userMessage":
      {
        "role": "user",
        "content": "Hello, please tell me which licenses does the user [email protected] have?"
      },
      "messageHistoryLimit": 10
    },
    "bypassCache": false
}
Example execution result
{
    "success": true,
    "data": {
        "sessionId": "pjk6AumJnByJrJdTQ",
        "executionId": "3b0b49e4-4b63-4a45-9d9a-bb59cece5650",
        "promptTokens": 1248
    }
}
From this execution result you can find two important variables:
- SessionID - allows you to continue this conversation in the next POST request to the same worker.
- ExecutionID - allows you to actually GET the execution status/result.
Get Execution Logs
- URL path:
api/v1/execution-logs?executionId={{ExecutionId}} - Method:
GET - Header:
Authorization: bearer <token>
Substitute {{ExecutionID}} with the ID returned by "Execute" POST request.
Example execution log retrieval result
{
    "success": true,
    "data": {
        "_id": "W3B6ZPGqWzy9PcASs",
        "executionStarted": "2025-09-22T07:01:19.758Z",
        "executionEnded": "2025-09-22T07:01:36.494Z",
        "nodeResults": [{
            "userMessage": {
                "role": "user",
                "content": "Hello, please tell me which licenses does the user [email protected] have?"
            },
            "messageHistoryLimit": 10
        }, {
            "ok": true,
            "result": {
                "role": "assistant",
                "content": "### Licenses for [email protected]\n\n| User (UPN) | Assigned licenses |\n|---|---|\n| [email protected] | - Power BI (Free)  \n- Microsoft Power Automate Free  \n- Microsoft 365 Business Basic |",
                "refusal": null,
                "annotations": []
            },
            "nodeId": 1,
            "executionStarted": "2025-09-22T07:01:19.761Z",
            "executionFinished": "2025-09-22T07:01:36.494Z"
        }],
        "ctx": {
            "userId": "BXBH9cs77TsvhjjsH",
            "agentId": "ZbAfoT2ecydnFZC4K",
            "sessionId": "pZk6AumJnByJrJdTQ",
            "executionId": "3b0b49e4-4b63-4a45-9d9a-bb59cece5650"
        },
        "time": 16736,
        "finalResult": []
    }
}
From this answer in JSON format you can easily extract LLM response, as well as check other parameters, such as the amount of time it took.
Get Execution Result
- URL path:
api/v1/execution-result?executionId={{ExecutionId}} - Method:
GET - Header:
Authorization: bearer <token>
This endpoint returns the final result and status of an execution. It provides a simpler, lighter response compared to execution-logs - ideal when you only need the outcome rather than detailed node-by-node execution data.
Substitute {{ExecutionID}} with the ID returned by "Execute" POST request.
Example execution result retrieval
{
    "success": true,
    "status": "ended",
    "executionStarted": "2025-09-22T07:01:19.758Z",
    "executionEnded": "2025-09-22T07:01:36.494Z",
    "result": {
        "role": "assistant",
        "content": "### Licenses for [email protected]\n\n| User (UPN) | Assigned licenses |\n|---|---|\n| [email protected] | - Power BI (Free)  \n- Microsoft Power Automate Free  \n- Microsoft 365 Business Basic |"
    }
}
When to use execution-result vs execution-logs
| Endpoint | Use Case |
|---|---|
execution-result | When you only need the final output and status |
execution-logs | When you need detailed debugging info, node-by-node results, or timing data |
Possible status values
started- Execution is still in progressended- Execution finished successfullyfailed- Execution encountered an error
Response fields
| Field | Description |
|---|---|
success | Whether the API call succeeded |
status | Execution status (started, ended, or failed) |
executionStarted | Timestamp when execution began |
executionEnded | Timestamp when execution completed (only present if finished) |
result | The final output from the execution (only present if successful) |
error | Error details (only present if failed) |
HTTP Status Codes
All API endpoints return standard HTTP status codes:
| Status Code | Meaning |
|---|---|
200 | Success - Request completed successfully |
400 | Bad Request - Invalid parameters or missing required fields |
401 | Unauthorized - Invalid or missing authentication token |
403 | Forbidden - Token lacks required scope/permissions |
404 | Not Found - Execution ID does not exist |
405 | Method Not Allowed - Wrong HTTP method used |
429 | Too Many Requests - Rate limit exceeded. See KB003: Rate limit exceeded |
500 | Internal Server Error - Server-side error |
Error Response Format
{
    "success": false,
    "error": "Error message describing what went wrong"
}